
Following this tutorial, you will learn how an IoT system works from the device through the server to the front end. It is a highly simplified example, so it is easy to understand. It uses google protobuf to serial data between the different stages. Using protobuf for IoT and servers is incredibly popular. The package we use for the server has a weekly download count of over 8.5 million times at the time of writing.
Using protobuf, we can efficiently serialize data in a cross-platform binary format. This is an advantage as we are dealing with different programming languages and platforms in IoT.
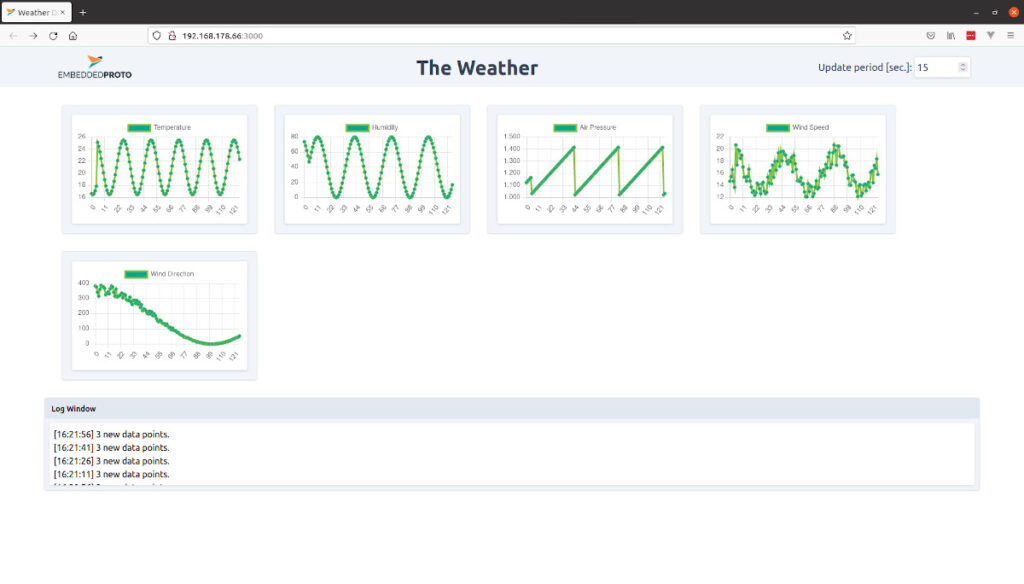
To make this example less abstract, we have chosen to simulate sensing weather data and display this in the browser.
Source code
The source code for this example is available on GitHub.Version
This example is up to date with version 3.4.1 of the source code.The quick start guide
For this example, several requirements need to be met. You need to have installed Python, Protoc (the protobuf compiler), NPM, and NodeJS. Please consult the Readme file with the source code to see which version matches this example’s current version.
After installing the dependencies mentioned in the Readme, clone the repo. Because the dependencies are installed, you can enter the folder and run the setup script to:
- setup the python virtual environment, and
- generate the source code based on the .proto file.
python setup.py
To be able to build the Arduino sketch, we need to install Embedded Proto as an Arduino library. For now, we do this manually by copying the code to the Arduino library folder.
On my Linux system, this is:
mkdir ~/Arduino/libraries/EmbeddedProto_Library
cp EmbeddedProto/src/* ~/Arduino/libraries/EmbeddedProto_Library/
Next, open your Arduino IDE and edit the header file settings.h. First, you will out your WiFi network name and password. All you now have to know is the computer’s IP address from which you will run the server. Replace the 0.0.0.0 with your server IP.
// Please enter your WiFi SSID and password in the following constants.
constexpr char SECRET_SSID[] = "YOUR_WIFI_NAME";
constexpr char SECRET_PASS[] = "YOUR_WIFI_PASSWORD";

// Please enter your server IP and port number in the following constants.
constexpr char SERVER_IP[] = "0.0.0.0";
constexpr int SERVER_PORT = 3000;
You can now build the sketch. The board I used is the Arduino Pro Portenta H7 writing the code to the M7 core. You can open the serial terminal to see debug output.
Next, we will configure the IP address in the server app: NodeServer/app.js.
const hostname = '0.0.0.0';
const port = 3000;
Following that, we will install de dependencies for the server and build and run it.
cd NodeServer
npm install
npm run server
You can now access the front end on your browser at: http://0.0.0.0:3000. Again replace 0.0.0.0 with your actual server IP address.
The high-level overview
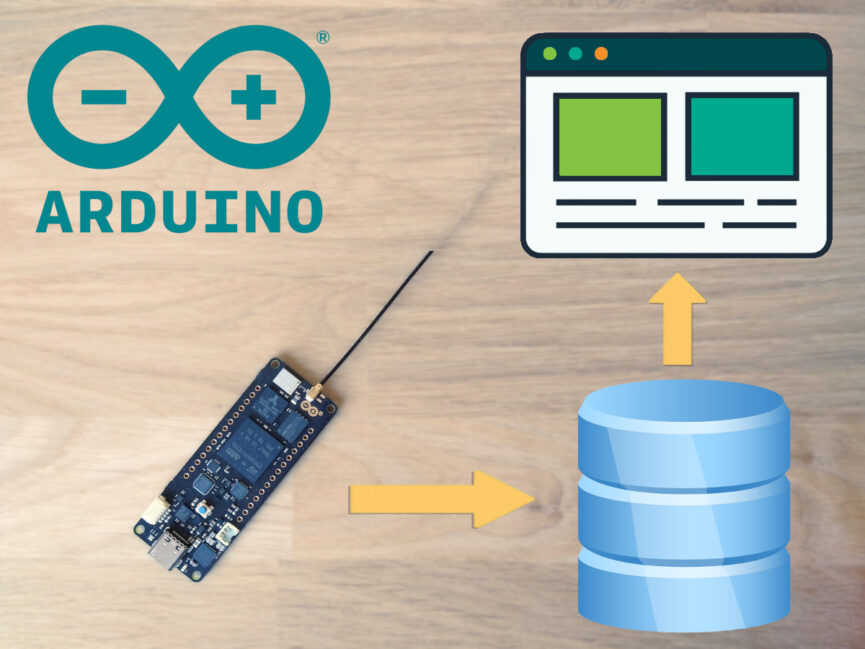
Before we dive into the details, let’s look from a distance. What is happening in this example? The situation is depicted graphically below. On the left is the Arduino which communicates with the server in the middle. This server, in turn, serves the front end to the users accessing it via a web browser.

At startup, the Arduino will query the server for settings by sending an HTTP get request. The response from the server holds the settings protobuf data. This data specifies the period between sending weather data to the server during regular operation.

message Settings {
  // The period between two updates given in seconds.
  int32 update_period_sec = 1;
}
Regular operation starts after the settings message has been received correctly. A new set of weather measurements is sent to the server during normal operations. The weather data in this example comprises temperature, humidity, air pressure, wind speed, and direction.
For simplicity of this example, no actual sensors are connected to the Arduino. All data is semi-randomly generated.

message Data {
  float temperature     = 1;
  float humidity        = 2;
  int32 air_pressure    = 3;
  float wind_speed      = 4;
  float wind_direction  = 5;
}
Al the weather data received by the server is locally stored. To simplify this example, no database is connected to the server. Weather data received from the Arduino is stored in a local array in the server code. Every time the front end requests data from the server, the array sent to the front end is cleared.
The front end code is also served from the same web server. Using some javascript code, it repeatably requests the latest weather data from the server. Each time the server responds with a DataHistory message. This message holds the array with data received from the Arduino after the last request.

message DataHistory {
  repeated Data data = 1;
}
Next, the javascript code in the front end uses this data to plot graphs. A log window will inform you when and how many data points were received.
The setup
Let’s look at the different folders you will get when cloning this example from GitHub.
Tree -L 1
.
├── ArduinoClient
├── EmbeddedProto
├── NodeServer
└── Proto
The proto file describing the weather data is located in the folder Proto. The file Weather.proto defines multiple messages: the settings, a measurement update from de MCU to the server, and a message holding multiple measurement updates from the server to the front end.
The device we use in this example is an Arduino Pro Portenta H7. As we simulate the sensor data, no additional hardware is required. If you want, you can of course add your own sensors. The sketch together with the additional header and source files can be found in the folder ArduinoClient.
Hardware
With minor tweaks, it is expected that this example will work with any other WiFi-enabled Arduino. The Protenta H7 makes use of an RGB led. When using a different board you may need to check this part of the code.The server for this example is built using Node.js. The server is just a single file: NodeServer/App.js. It requires just two additional node packages: protobufjs and browserify. ProtobufJS is the package used to serialize and deserialze protobuf data in javascript. Browserify is used for packaging the javascript code generated from our weather proto file such that the fronted can use it in the browser.
The main file of the front end is NodeServer/static/home.html. It relies on the weather proto files mentioned above. To further create the front end, Alpine.js, Tailwind, and ChartJS have been used.
The Arduino
Two helper classes have been created to separate different parts of the code. The first is to obtain the settings data from the server. The second is to generate and post weather data. Let’s go through those in that order.
Obtaining settings from the server
The class WeatherSettings is the helper class holding the current settings and requesting an updated version from the server at startup. The request is made in the Arduino setup() function.
// Request the settings from the server.
weather_settings.request_from_server();
The first thing this function does is call an internal class function which makes the actual request: get_data_buffer_from_server(). What happens in this function is that a connection is made with the server. Next, a get request is made to the settings API URL. This is done by sending the following text:
GET /api/settings HTTP/1.1
Host: 0.0.0.0/api/settings
Connection: close
Please note the empty white line, which signals the end of the request. Next, the code will wait for a response. This is a combination of plain text and non-ASCII binary data.
HTTP/1.1 200 OK
Content-Type: application/x-protobuf
Date: Tue, 16 Aug 2022 13:07:43 GMT
Connection: close
Transfer-Encoding: chunked

2

0
In this response, you see that the data transmitted will be of the type protobuf (line 2). Also, the connection will be closed after the transmission is done (line 4). Any data which follows will be sent in chunks (line 5). You will have to concatenate the binary data you receive if it is spread out over multiple transmissions.
So the exciting thing here is what you do not see. Please note the two on line 7. This indicates that after the next \r\n, two bytes of data will be transmitted instead of ASCII data. The zero at line 9 means that no more bytes are to be expected, followed by an empty line.
The actual bytes received are: [8, 5], stored in the read buffer. This buffer is deserialized into an Embedded Proto message object named weaThe new update time is printed or an error dependingings_. Depending on if the data formed a correct protobuf message.
bool WeatherSettings::request_from_server()
{
  bool result = get_data_buffer_from_server();
  if(result)
  {
    // Deserialize the settings from the read buffer.
    const auto desrialize_result = weather_settings_.deserialize(read_buffer_);
    if(EmbeddedProto::Error::NO_ERRORS == desrialize_result)
    {
      Serial.println("Settings received: update_period_sec=" +
                     String(weather_settings_.get_update_period_sec()));
    }
    else
    {
      result = false;
      Serial.println("Failed to deserialize settings.");
    }

    // Clear the read buffer.
    read_buffer_.clear();
  }

  return result;
}
Posting weather data
After obtaining the settings in the setup function, the main loop starts. In this loop, after the given update period, a new set of data is generated using the update() function form the WeatherData class. The update function generates the semi-random data. Replace this function if you wish to read out some actual sensors.
void loop()
{
  now_time = millis();
  if(WL_CONNECTED == WiFi.status())
  {
    signal_oke();

    if(now_time >= update_time)
    {
      weather_data.update();
      weather_data.serialize_and_send();

      // Reset the timer for the next update.
      update_time = now_time + (1000 * weather_settings.get().get_update_period_sec());
    }
  }
  else
  {
    connect_to_wifi();
  }
}
Next, sending the data is done in two steps. First, the weather_data_ message object is serialized to the binary write buffer. This write buffer is next used in the post() function which sends the data to the server.
bool WeatherData::serialize_and_send()
{
  // Serialize the weather data.
  const auto serialize_result = weather_data_.serialize(write_buffer_);

  // If all went well start connecting to the server.
  bool result = (EmbeddedProto::Error::NO_ERRORS == serialize_result) && post();

  // Clear the write buffer after using it.
  write_buffer_.clear();

  return result;
}
Making the post request to the server is similar to the get request. However, this time we post data to the server. In this case, there are 0x17 bytes or 23 for non-programmers. Again the bytes are not printable ASCII characters, but the Arduino is trying.
POST /api/data HTTP/1.1
Host: 0.0.0.0/api/data
Content-Type: application/x-protobuf
Connection: close
Transfer-Encoding: chunked

17
,i⸮A1⸮B⸮%⸮⸮A-P⸮C
0
The server
So how does the server deal with this data? Let’s take a look at the NodeJS code.
The server starts after setting up different variables and loading the .proto file. For this server, we do our routing. The server uses the default HTTP library. No advanced packages like express are used. The sort of DIY approach makes it easy to see what is going on. In this case, we check if the URL starts with /api. In this case, we start running the API function. In any other case, the home page front end is severed. More on that later. First, let’s do the initial setup of protobufjs.
Loading .proto filles
In this example, we use protobufjs to work with protobuf messages in JavaScript. ProtobufJS is immensely popular, with more than 8.5 million weekly downloads at the time of writing. It is easy to use in your system without compilation of the .proto file. Just load the .proto file(s), and the package will work.
const protobuf = require("protobufjs");
protobuf.load("../Proto/weather.proto", function(err, root) {
When the file loading is completed, we can continue by obtaining references to the message definitions. Please note the usage of the weather. which comes from the use of package weather; in the proto file.
  DataMessage = root.lookupType("weather.Data");
  DataHistoryMessage = root.lookupType("weather.DataHistory");
  SettingsMessage = root.lookupType("weather.Settings");
These objects are not actual message objects. They are used to create a message. You can create an empty message or one with initial values based on a plain JavaScript object.
  // Create an empty message
  data_history = DataHistoryMessage.create();

  // Set the default settings, a 5 second update period.
  const default_settings = {updatePeriodSec: 5}
  const errMsg = SettingsMessage.verify(default_settings);
  if(errMsg) {
    throw Error(errMsg);
  }
  else {
    weather_settings = SettingsMessage.create(default_settings);
    console.log(`weather_settings = ${JSON.stringify(weather_settings)}`)
  }
In the latter case, we first verify the data provided. We can create the message object if the JavaScript object is defined properly. The update period of the Arduino is set to 5 seconds in the settings message. This message is ready to be served.
Serving settings
  // Create a server object which listens to various end points.
  const server = http.createServer((req, res) => {
    if(req.url.startsWith("/api")) {
      // Process requests directed to the API.
      server_api(req, res)
    }
    else {
      // In any other case serve the homepage.
      server_home(req, res)
    }
  });

  // Start the server. When it started report the IP and port it is running on.
  server.listen(port, hostname, () => {
    console.log(`Server running at http://${hostname}:${port}/`);
  });
Another function separates out calls to the /api/settings and /api/data. Let’s look at the code of the settings API. After entering the function, the type of request is checked. The settings API now only supports a GET request. Any other type of request will result in a 405 error: “Method Not Allowed“.
// Process POST and GET requests to the weather settings API.
function server_api_settings(req, res) {
  if('GET' == req.method) {
    console.log("/api/settings GET")
    // Get request, return the current settings
    res.setHeader("Content-Type", "application/x-protobuf");
    res.writeHead(200);
    let settings_buffer = SettingsMessage.encode(weather_settings).finish();
    console.log(`settings_buffer = ${Array.prototype.toString.call(settings_buffer)}`);
    res.end(settings_buffer);
  }
  else {
    // Return an error in any other case.
    res.writeHead(405);
    res.end();
  }
}
The GET request is answered by returning the type of data x-protobuf, just like we saw earlier. Also, the status code 200 is set. But of course, the point of the whole request is to obtain the settings data. This binary data is obtained by encoding (serializing) the weather_settings protobuf object into a byte array name settings_buffer. The result object is simply given this byte array with its end() function. This is all that is required to send binary data in a response.
Receiving data
Having the server receive binary data takes just a little more code. Let’s look at the code processing a POST request to /api/data. This function is set up such that each time a chunk of binary data is received, it is appended to the receive_buffer, which is an array of bytes. When the request end has been reached, the buffer is decoded (deserialized). The result is a JavaScript object named message representing a weather data protobuf message.
  if('POST' == req.method) {
    console.log("/api/data POST");
    // An empty buffer to store the data received.
    let receive_buffer = Buffer.alloc(0);

    req.on('data', function(chunk) {
      const temp = receive_buffer.slice();
      receive_buffer = new Buffer.concat([temp, chunk]);
    })
    req.on('end', function() {
      console.log('Body: ')
      let data_str = ''
      for(let pair of receive_buffer.entries()) {
        data_str += pair[1].toString() + ", ";
      }
      console.log(data_str);

      let message = DataMessage.decode(receive_buffer);
      console.log('Message: ');
      console.log(message);

      // This is normally where you would add the data in database.
      // In this demo we use a simple array.
      //weather_data_objects.push(message);
      data_history.data.push(message);

      res.writeHead(200);
      res.end();
    })
  }
In normal circumstances, this data would be stored in a database. The newly received data is directly pushed into an array for this simple example. The array is part of the data_history message. This is the message requested by the front end.
The server serves the front end by sending the files requested. This is done from the function server_home().
The front end
The front end is a simple one-page website displaying the weather data. It is built using ChartJS to display the data, Tailwind for styling, and Alpine.js to add some logic.
Packaging the protobuf code
On the client side, in the browser, we can not load the .proto file from the hard disk as we did in the server code. One way to overcome this is by generating javascript code and bundling it together with all its dependencies. This is done during the server build process.
"scripts": {
  "generate": "./node_modules/.bin/pbjs -t static-module -w commonjs -o weather.js ../Proto/weather.proto",
  "bundle": "./node_modules/.bin/browserify weather.js --standalone weather -o static/weather_bundle.js",
  "build": "npm run generate && npm run bundle",
  "server": "npm run build && node app.js"
}
The code generated is based on the proto file using protobufjs static-module option. Browserify is the package used to bundle all the code. It recursively checks all the dependencies and includes them in one javascript file. In this example, this file is called static/weather_bundle.js. This bundle is included via an HTML script tag and served to the browser when loading the home.html file.
<script type="module" src="./weather_bundle.js" defer></script>
Requesting data
By using AlpineJS it is possible to write javascript code in HTML elements. This was done for the spin button setting the update period of the front end. The code around this input is shown below.
<!-- Input for update period -->
<div>
  <div x-data="{update_period:5, intervalID:''}"
       x-init="intervalID = setInterval(function() { $store.weather.get_data_from_server() }, 1000*update_period)">
    <label for="update_period">Update period [sec.]: </label>
    <input type="number" class="box border rounded shadow p-1"
           maxlength="3" size="3" x-model.number="update_period"
           x-on:change.debounce="clearInterval(intervalID);
                                 intervalID = setInterval(function() { $store.weather.get_data_from_server() }, 1000*update_period);
                                 $store.logging.add(`Update period changed to: ${update_period} seconds.`)"
           name="update_period" id="update_period" min="1" max="120" step="1">
 </div>
</div>
The critical point here is that the setInterval() function is used to call a function that requests data from the server. When the value of the input changes, the timer is cleared and reset. An Alpine data store defines the function requesting the server’s data.
Alpine.store('weather', {
  lastData: {},

  async get_data_from_server() {
    const controller = new AbortController()
    const timeoutId = setTimeout(() => controller.abort(), 4000)
    const server_url = window.location.href + "api/data";
    try {
      const response = await fetch(server_url);
      if(!response.ok) {
        throw new Error();
      }
      this.lastData = weather.weather.DataHistory.decode(new Uint8Array(await response.arrayBuffer()));
      console.log("lastData: " + Alpine.raw(this.lastData));
      Alpine.store('logging').add(`${this.lastData.data.length} new data points.`)
    }
    catch(err) {
      Alpine.store('logging').add("Unable to fetch data from server.")
    }
  },
}),
Inside the data store last received data history message is stored. This data is obtained by fetching it from the server. In the response, an array of bytes is found. This data is used to decode(deserialize) into a DataHistory message object.
Displaying data
All charts are updated by placing an AlpineJS watch callback on the lastData variable. This watch will trigger the update() function linked to the specific chart object.
<template x-for="cc in chartConstants" :key="cc.varName"
          x-init="$watch('$store.weather.lastData',
                         lastData => console.log(Alpine.raw(lastData)))">
  <canvas height="180" :id="cc.varName" x-init="allocate()"
          x-effect="update($store.weather.lastData)"></canvas>
All configurations for the charts have been stored in an AlpineJS data object. Alpine creates one object for each chart defined in the chartConstants variable. The allocate() and update() functions are thus called for each chart individually.
Further Improvements
I hope this was helpful to you. If you want to understand this example further, I suggest you get coding yourself. Things you could add are:
- Set the update period of the Arduino from the front end
- Support multiple Arduino’s
- Add a database
- Add HTTPS
If you have any questions, let me know!
If you find this kind of example informative, please consider reading one of our other examples, like Store data on NFC tags with Protobuf.