

This example shows how you could use protobuf to store structured data on NFC tags. Embedded Proto is used to make messages and store a name and clearance in an NFC tag, simulating access tags is a simple way. You can extend on this example for your own application easily.
In the following we will take you through the setup of this example, what kind of messages are used and how the embedded code receives and sends the messages. Finally, we will look at how to run the code.
Source code
The source code for this example is available on GitHub.Version
This example is up to date with version 3.4.2 of the source code.The setup
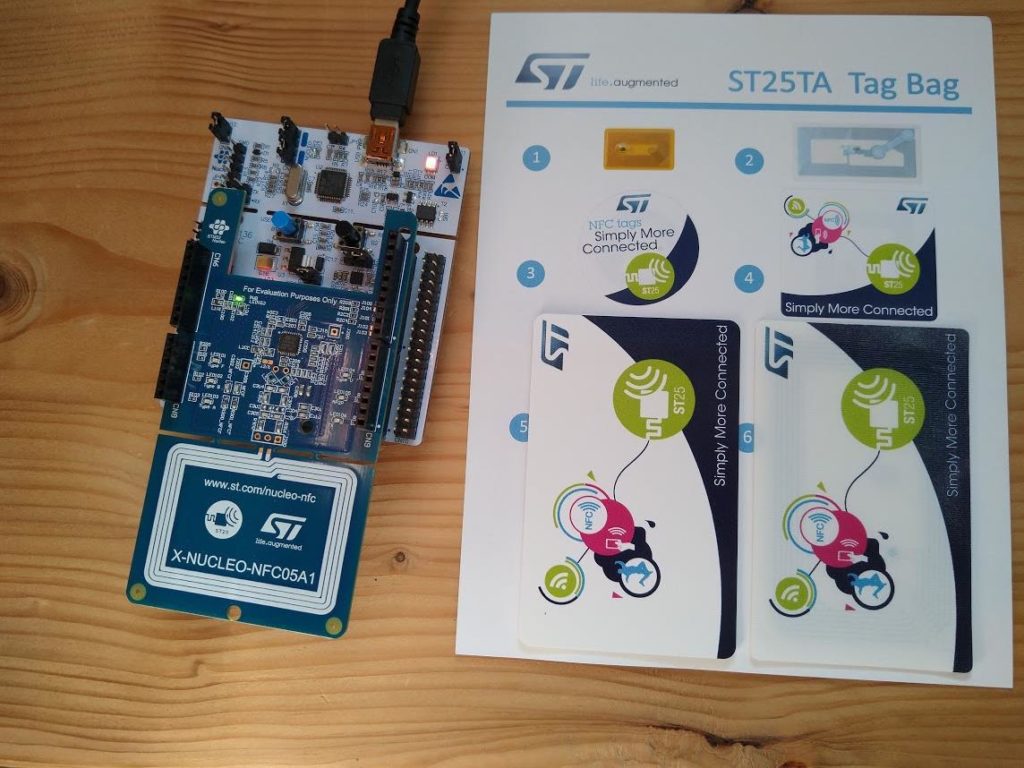
During this example we are using a NUCLEO-F446RE made by ST Microelectronics. This is an easy to use development board with an ARM Cortex-M4 processor. The board does not require an additional programmer and is readily available. For NFC we use a X-NUCLEO-NFC05A1 evaluation board and a ST25TA NFC tag.
Connect the NFC evaluation board to the microcontroller and connect the microcontroller via USB to your PC.
The code in the repository is divided into three folders:
tree -L 1
.
├── EmbeddedProto
├── Nucleo-f446re
└── proto
The EmbeddedProto folder holds Embedded Proto as a git submodule. This way it is possible to track matching versions of this example and Embedded Proto.
The nucleo-f446re folder holds the embedded code. It is a project made with STM32CubeIDE version 1.3.0. The project is built using X-CUBE-NFC5 expansion software for STM32Cube. This STM32Cube expansion software supports the NFC X-NUCLEO-NFC05A1 evaluation board in combination with STM32 microcontrollers.
The proto folder holds the definition of the protocol buffer message used in this example. The next paragraph discusses this in more detail.
The messages
For this example, one message has been defined. This message holds two variables. The first variable is an enum to store a clearance (No access, dep. A, dep. B or dep. C). The second variable is a string holding the name of the NFC tag owner. In the generated C++ code using Embedded Proto, the max
length for this string is specified using a non-type template parameter. In this way no dynamic memory allocation is needed, to allocate memory for this string.
syntax = "proto3";

message nfc
{

  enum CLEARANCE
  {
	NO_ACCESS = 0;
	DEPARTMENT_A = 1;
	DEPARTMENT_B = 2;
	DEPARTMENT_C = 3;
  }

  CLEARANCE clearance = 1;
  string name = 2;
}
Sending and receiving using NFC
Next, we are going to take a look at the embedded code and how NFC works. NFC uses NFC Data Exchange Format (NDEF) to exchange information between an NFC device and another NFC device/tag. NDEF introduces records which are used to standardize the way information is stored and exchanged. For example, there a record type to store a URI, which could be used to store the URL to a website. Since these records are standardized (by NFC forum), devices that read this record recognize that this is a URL and can determine the appropriate actions. Custom application could use information that is not standardized. Embedded Proto helps to structure this information.
The X-CUBE-NFC5 already contains a demo application using NDEF to exchange data with an NFC tag. The file ndef_EmbeddedProto_demo.c is based on this demo to read and write NDEF records. For exchanging the protobuf messages, an external record named Embedded Proto is used. External records are meant for exchanging information that is not standardized by NFC forum.
All processing of the protobuf messages, such as serialize and deserialize are described in in the NFCProcessMessage.cpp file. In the nfc_read_tag function the command is received and deserialized. Next the nfc message is processed, which in this case prints the name and clearance.
//! Function receives message from tag and deserializes it
/*!
 * \param[in] byte Protobuf serialized message .
 * \param[in] data_length Length of NFC EmbeddedProto message.
 */
void nfc_read_tag(const uint8_t *byte, uint8_t data_length)
{
  // Protobuf message length is stored in first byte
  uint8_t n_bytes = byte[0]+1;

  if(n_bytes <= data_length)
  {
    for(uint8_t i=1; i<n_bytes; i++)
    {
      read_buffer.push(byte[i]);
    }

    // Deserialize the data received.
    auto deserialize_status = nfc_tag.deserialize(read_buffer);
    if(::EmbeddedProto::Error::NO_ERRORS == deserialize_status)
    {
      // Process the command.
      process_nfc_tag(nfc_tag);
    }
  }
  read_buffer.clear();
}
In the nfc_write_tag function the protobuf variables name and clearance are set. Next the message is serialized and the write_buffer is copied to another buffer before the protobuf message is formatted in an NDEF text record.
//! Function builds serialized protobuf message.
//! And copies the message to a buffer.
/*!
 * \param[out] buf Protobuf serialized message .
 * \param[out] len Length of NFC EmbeddedProto message.
 */
void nfc_write_tag(uint8_t* buf, uint32_t *len)
{
  uint32_t message_len_index = write_buffer.get_size();
  write_buffer.push(0); //placeholder for buffer length

  nfc_tag.set_clearance(nfc<NAME_LENGTH>::CLEARANCE::DEPARTMENT_B);

  char name_input[] = "EmbeddedProto";

  for(uint8_t i=0; i<strlen(name_input); i++){
    nfc_tag.mutable_name()[i] = name_input[i];
  }

  // Serialize the data.
  auto serialization_status = nfc_tag.serialize(write_buffer);
  if(::EmbeddedProto::Error::NO_ERRORS == serialization_status)
  {
    write_buffer.get_data()[message_len_index] = write_buffer.get_size()-1;

    for (uint8_t i=0; i<write_buffer.get_size(); i++){
      buf[i] = write_buffer.get_data()[i];
    }

    *len = write_buffer.get_size();
  }

  write_buffer.clear();
}
Running the Code
Now we can run the code. Connect the NFC evaluation board to the NUCLEO and connect the USB cable to the PC. Next program the NUCLEO. The details on how to install this example is described in the README (link) of this example.
Start a terminal such as PuTTY, to open a serial connection (baud rate 115200) using the COM port that belongs to the NUCLEO. You should see something like this:
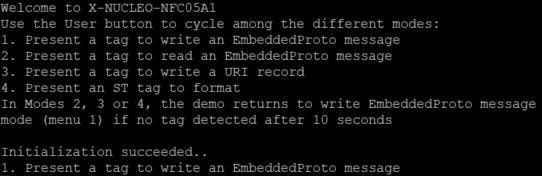
With the blue user button on the NUCLEO board you can control the different options. There are 4 options:
- Write Embedded Proto message to tag.
- Read Embedded Proto message from tag.
- Write Embedded Proto URL to tag. When you scan the tag with a device such as a smartphone automatically opens the Embedded Proto website.
- Format ST tag.
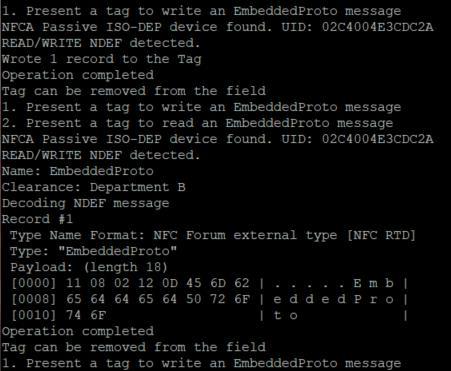
To see Embedded Proto in action, first select option 3 to write the embedded proto message to the tag. Bring the NFC tag to the NFC device. You should see confirmation in the terminal that a record is written to the tag. Next select option 2 and bring the NFC tag to the reader. You should see the name and clearance printed in the terminal. It should look something like this:
If you find this kind of examples informative please consider reading one of our other examples like: A simple UART example with Embedded Proto